The Browser SDK (Software Development Kit) allows you to accept card payments from your customers by hosting your own iframe using TabaPay's provided javascript solution all without the hassle of meeting PCI-DSS requirements. You can embed the Custom iFrame as a low-code customizable payment experience right on your website.
Hosting the iFrame Securely (HTTPS Required)The Browser SDK requires a Secure Context when hosting an iframe and only supports environments compatible with standard Web Crypto API.
Basic Custom iFrame
The Custom iFrame is a payment checkout experience that loads right into your website, or app to give a streamlined experience for your customer. You can customize your checkout experience for a seamless look and feel for your payment workflow.
Begin with the following configuration. Follow the sections below to walkthrough how to customize this iFrame by adding configs.
Client ID Required for Custom iFrameA sandbox client ID will be used for the sandbox Custom iFrame. A production client ID will only be given when you are ready to move into production. Do not use the production client ID in sandbox.
Note: As you board with TabaPay, you should receive a script and URL that will reference all the Browser SDK keys
const { element } = tabaPaySdk.createIframe({
cardNumberInput: {},
expirationDateInput: {},
cscInput: {},
buttons: {
submit: {
order: '1'
},
reset: {
order: '2'
},
cancel: {
order: '3'
}
},
eventListeners: {
focusChange: () => { },
submit: () => { },
cancel: () => { },
},
clientId: "your-sandbox-client-ID-goes-here",
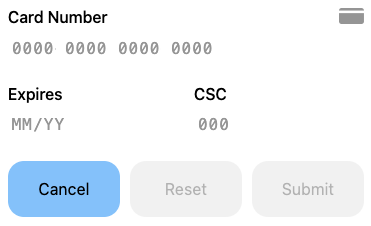
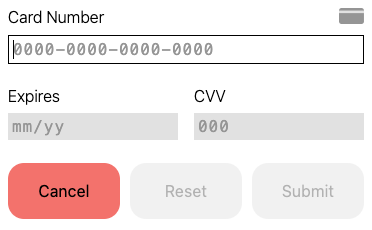
});Here is what the iFrame looks like right now. You can complete the card input by selecting the grayed area and typing in each value.
Card Number Input
Customize the entry field for the card number with "cardNumberInput".
Only Use Sandbox Card Values When Testing in SandboxYou should only use Sandbox Test Card Values when using the Custom iFrame in Sandbox. Do not input real card values when testing sandbox.
Include the following change:
- Add
"-"as separator for inputting the digits instead of the default space" "
Here is the revised section of the config:
cardNumberInput: {
separator: "-",
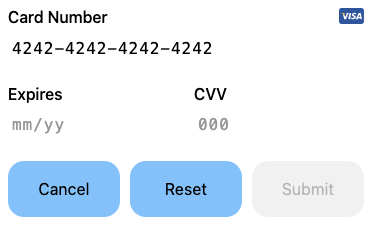
},Here is what the revised iFrame looks like with the line separator.

Expiration Date Input
Customize the entry field for the expiration date with "expirationDateInput".
Change the following placeholder text (displayed in gray) from "MM/YY" to "mm/yy".
expirationDateInput: {
    placeholderText: "mm/yy"
},
CSC Input
Customize the entry field for the CSV (also known as CVV) with "cscInput".
Change the label text from "CSC" to "CVV".
cscInput: {
    labelText: "CVV"
},
Here is what the revised iFrame looks like with the two changes and a sample Card Number typed in.
Buttons
The iFrame comes with three buttons: cancel, reset, and submit. You can customize the background color of the buttons when they are enabled and when the cursor hovers over them. Each button can be customized individually.
Here is the revised config:
buttons: {
submit: {
backgroundColorEnabled: "#88f",
backgroundColorHover: "#aaf",
order: '1',
},
reset: {
backgroundColorEnabled: "#3f3",
backgroundColorHover: "#9f9",
order: '2',
},
cancel: {
backgroundColorEnabled: "#f55",
backgroundColorHover: "#f88",
order: '3',
},
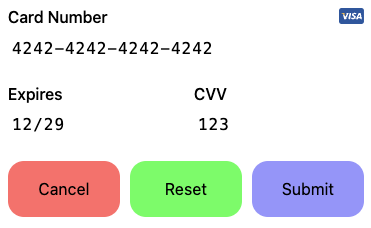
},Here is what the iFrame looks like now with change in the color of the buttons. Notice the sample expiration date and CVV typed in.
Label Style
Customize the CSS styling for the label text with “labelStyle”. This is optional, and by default will display as 500px.
Change the font weight from the default of "500" to "300" (the text will look less bold).
labelStyle: {
fontWeight: "300",
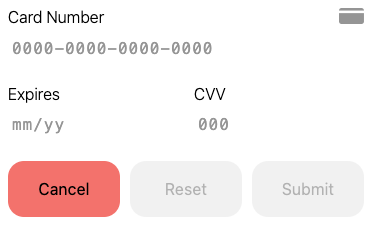
},Here is what the iFrame looks like with a lower font weight. Notice fields have been reset/unpopulated.
Note: Reset and Submit buttons are grayed out when fields are not populated.
Input Style
Customize the CSS styling for the input field using "inputStyle".
Change the input background color from white to gray.
inputStyle: {
    backgroundColor: "#ddd",
},
Change the input border to black.
inputStyle: {
    borderStyle: "1.5px solid",
    borderColor: "#000"
},
Here is the what the iFrame looks like now.
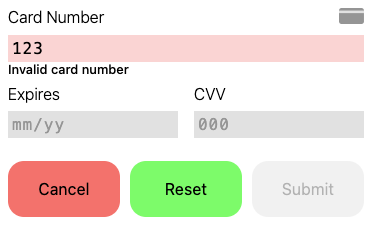
Invalid Style
An invalid message is displayed when the input is invalid (such as wrong formatting). We can customize this using "invalidStyle".
Change the following textColor from red (default) to black.
invalidStyle: {
    textColor: "#000",
},
Here is what the iFrame looks like now.
Event Listeners
We are able to specify custom functions that are triggered by certain events in the iFrame. These three functions are focusChange, submit, and cancel. Currently in the example iFrame these functions are left empty. Follow the next section to learn how to use the event listeners.
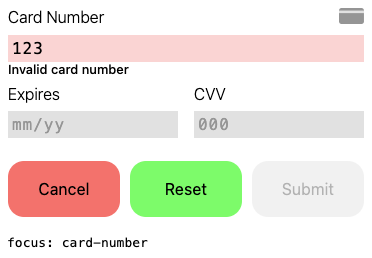
Focus Change
The focusChange function is called when the element in focus changes. For example, this function is called when the focus shifts from the card number input to the expiration date input. The function will take as a parameter the element that is in focus.
As a demonstration, we will have the element in focus be printed out onto a preformatted text element (pre).
Here is the revised config:
focusChange: (focused) => {
    preEl.firstChild.nodeValue = 'focus: ' + String(focused);
},
Here is what the iFrame looks like now. Notice the text printed out at the bottom showing that the focus in on the card number.
Submit
The submit function is called when the submit button is pressed. The submit function takes in as input the encrypted token.
As a demonstration, we will have the encrypted token printed out once the iFrame is submitted.
submit: () => {
    preEl.firstChild.nodeValue = encryptedCardData ?? ' ';
},
Here is what the iFrame looks like after the submit button is pressed. Notice the token printed out (the full token is cutoff in the screenshot).
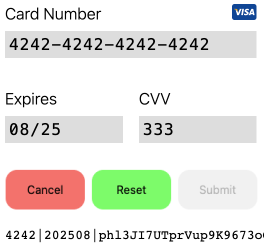
The iFrame generates a string with an encrypted token to be used for the TabaPay API (e.g. Create Account, Create Transaction, Query Card). Be sure to specify the proper logic for this function.
The token returned after submission will by default show as three fields separated by pipe symbols: "card-last4|expiration-date|encrypted-card-token". Only the encrypted-card-token should be used for the TabaPay API requests.
Note: Do not include the thelast4 or expiration-date as the iFrame token value in the Create Account, Create Transaction, or Query Card parameters.
Card Token ExpirationThe card token generated by the iFrame, expires around 5 minutes. You can immediately create a transaction, or create an account to save card info.
iFrame Token Examples
You can see how the iFrame token is used in the following Create Transaction example.
Cancel
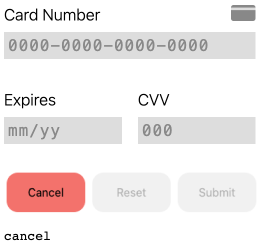
The cancel function is called when the cancel button is pressed. As a demonstration, we will have a message printed out saying "cancel".
Here is the revised config:
cancel: () => {
    preEl.firstChild.nodeValue = 'cancel';
},
Here is what the iFrame looks like after the cancel button is pressed.
Full Code Sample
Copy the full code into a script tag. You will need your Sandbox Client ID and the JavaScript file hosted at a unique URL (where the SDK is hosted) you will receive from TabaPay.
    <script src="Need to Request SDK Script from TabaPay, email [email protected]"> </script>


<div id="target">
    <pre id="result"></pre>
</div>

<script>
const preEl = document.getElementById("result");
    preEl.append("start")
const { element } = tabaPaySdk.createIframe({
  cardNumberInput: { separator: "-", },
  expirationDateInput: { placeholderText: "mm/yy" },
  cscInput: { labelText: "CVV" },
  buttons: {
    submit: {
      backgroundColorEnabled: "#88f",
      backgroundColorHover: "#aaf",
      order: '1',
    },
    reset: {
      backgroundColorEnabled: "#3f3",
      backgroundColorHover: "#9f9",
      order: '2',
    },
    cancel: {
      backgroundColorEnabled: "#f55",
      backgroundColorHover: "#f88",
      order: '3',
    },
  },
  labelStyle: {
    fontWeight: "300",
  },
  inputStyle: {
    backgroundColor: "#ddd",
  },
  invalidStyle: {
    textColor: "#000",
  },
  eventListeners: {
    focusChange: (focused) => {
      preEl.firstChild.nodeValue = 'focus: ' + String(focused);
    },
    submit: (encryptedCardData) => {
      preEl.firstChild.nodeValue = encryptedCardData ?? ' ';
    },
    cancel: () => {
      preEl.firstChild.nodeValue = 'cancel';
    },
  },
  clientId: "your-sandbox-client-ID-goes-here",
});
</script>
More Browser SDK References
For more JavaScript references and fields, refer to the Browser SDK reference.
Questions? Email [email protected].